Well I had hoped to make some posts from time to time about any new bee info out there and I've finally read a few things that piqued my interest so I thought I'd share:
Always some interesting articles this website but quite a bit of the information in this particular post that I had never heard of before! Both of these articles are very timely since we are in the middle of Winter.
Cool stuff about what a winter bee is and how they are formed
https://honeybeesuite.com/what-are-winter-bees-and-what-do-they-do/
Perhaps another piece to the puzzle as to why winter losses have skyrocketed since the mid 1980's (besides Varroa Destructor).
http://www.beeculture.com/catch-buzz-uw-stout-professor-students-identify-bacterium-may-kill-honey-bees/
I hope all your bee efforts are going strong out there and I do miss having the bees. On the other hand, I haven't spent all winter worrying about them! =)
Thursday, January 12, 2017

Tuesday, May 17, 2016
2016-05-17: Fond Farewell
I have really enjoyed this journey of discovery working with honeybees for the last four years. Sadly, as some readers may know, I became allergic to bee stings at the end of last Summer. I was stung behind the ear and broke out in hives across my waist. Having a severe reaction in the area of the sting is common but having a reaction in a different part of your body is generally considered anaphylaxis. Since I didn't really want to give up beekeeping, I began allergy shots. I did that for a few months and at the end of December "something" happened. Not positive it was a reaction to the shots or not but lets just say I've been to the doctor(s) more times this year than I have my entire life. To top it all off, we decided to move and we are downsizing significantly by moving to a condo. No room for even half of our stuff, let alone any bee hives! So, now I'm moving on to a new phase of life.
Although I won't directly be keeping bees anymore, I will still be working with them from time to time because my friend Keith has taken the two hives that I had survive the winter. I can still observe and help advise while in my full bee suit, bee gloves, duct taped ankles and armed with my Epi-Pen. We moved the hives to Keith's house this past Sunday and I'm glad to say it went off without a hitch! I have to thank Chris at Show Me The Honey for the idea on how to move the hives. All we did was quickly cut some strips of #8 hardware cloth and staple them over the hive entrance, make a frame out of 2x4s and screw it around the hive, put a few ratchet straps around the hives and we were able to easily move them all the way from the back corner of the property and up to where the trailer was.

The fact that the temperature was in the mid 40s while we were doing this also helped since the bees weren't even flying by the time we suited up. After we loaded up the hives and the cinder blocks that they were resting on, we strapped them down to the trailer and headed off to Keith's house to deliver the girls to their new home!

We started at 7 PM and we were unloading them right when it was getting dark. We used a small trailer and a lawn tractor to move them to their new location. Much to my chagrin we learned how light the hives really were as we EASILY picked them up by the ratchet straps as we transferred them onto the small trailer. We probably didn't even need the 2x4 frame at all. Oh well, at least it worked well and we didn't drop a hive! I was glad to get a text the next day saying that the girls had already adjusted to their new home and were flying and bringing in stores.
I am very thankful that God gave me the opportunity to experience one of His fantastic and marvelous creations in this way. I hope to share that experience with others and continue to go to the State of Michigan Beekeepers Spring conference with Keith. I think we'd go just for the Michigan State University cafeteria food across the street! =) I also hope to make a post to the blog every now and again as I come across interesting new bee topics. Perhaps someday I'll even have the ability to get back into beekeeping. Who knows what tomorrow may bring? Not sure what else to say in a sappy "goodbye" post except for:
Until next time, thanks for reading!
Mark
Although I won't directly be keeping bees anymore, I will still be working with them from time to time because my friend Keith has taken the two hives that I had survive the winter. I can still observe and help advise while in my full bee suit, bee gloves, duct taped ankles and armed with my Epi-Pen. We moved the hives to Keith's house this past Sunday and I'm glad to say it went off without a hitch! I have to thank Chris at Show Me The Honey for the idea on how to move the hives. All we did was quickly cut some strips of #8 hardware cloth and staple them over the hive entrance, make a frame out of 2x4s and screw it around the hive, put a few ratchet straps around the hives and we were able to easily move them all the way from the back corner of the property and up to where the trailer was.

The fact that the temperature was in the mid 40s while we were doing this also helped since the bees weren't even flying by the time we suited up. After we loaded up the hives and the cinder blocks that they were resting on, we strapped them down to the trailer and headed off to Keith's house to deliver the girls to their new home!

We started at 7 PM and we were unloading them right when it was getting dark. We used a small trailer and a lawn tractor to move them to their new location. Much to my chagrin we learned how light the hives really were as we EASILY picked them up by the ratchet straps as we transferred them onto the small trailer. We probably didn't even need the 2x4 frame at all. Oh well, at least it worked well and we didn't drop a hive! I was glad to get a text the next day saying that the girls had already adjusted to their new home and were flying and bringing in stores.
I am very thankful that God gave me the opportunity to experience one of His fantastic and marvelous creations in this way. I hope to share that experience with others and continue to go to the State of Michigan Beekeepers Spring conference with Keith. I think we'd go just for the Michigan State University cafeteria food across the street! =) I also hope to make a post to the blog every now and again as I come across interesting new bee topics. Perhaps someday I'll even have the ability to get back into beekeeping. Who knows what tomorrow may bring? Not sure what else to say in a sappy "goodbye" post except for:
Until next time, thanks for reading!
Mark
Monday, March 14, 2016
2016-03-14: Michigan Beekeeprs Association Conference
It must really be Spring time with the annual Michigan Beekeepers Conference here again. My friend Keith and I went on Saturday as usual. The keynote speaker was Gary Reuter from the University of Minnesota. He had two sessions and talked about what the general public think is wrong with bees (CCD) and what beekeepers think is wrong with bees (Varroa). The general theme I found throughout the conference was "test and know your mite levels" and "varroa are killing your bees".
Breakout sessions:
Our first breakout session was on swarm traps done by Matt Tannana. He was a very good speaker and managed the class questions very well. He does Top Bar hives and his swarm traps were all Top Bar style. His information followed the book Honeybee Democracy by Tom Seeley and he referenced the book a few times. I've read it before and I highly recommend it.
Our last session was Pests and Pathogens by Dr. Megan Milbrath. This is the same person from the Northern Bee Network that I bought queens from this past summer. She is also a very good speaker, natural and funny. She tried to be upbeat about a subject that can really be a downer for sure! My biggest takeaway from her session was a new approach to Varroa control. I have always been against treating the bees with chemicals and instead using Integrated Pest Management tools and looking for a genetic solution to pest problems. Well, she opened my eyes to a bit more of a middle ground that seems acceptable. The approach: If a hive has out of control mite levels, treat and then re-queen. The benefit here is: the hive doesn't die, you cycle through genetic combinations quicker to find the ones that work and you aren't creating a "mite bomb" when your hive crashes. So the remaining question is, if I decide to treat a select hive, what do I use? I think one of the Organic Acids is probably the way to go. I need to do more research.
Vendors:
It seems like every year there is some new gadget that shows up for beekeeping. This year it was the package funnel. Basically a piece of corrugated plastic that folds out into a funnel of sorts and instead of roughly dumping a package of bees into a hive, you gently invert the open package on top of this funnel on the outside of the hive and the bees just move down into the hive on their own. I suppose that would work just fine but I guess I've never had an issue installing them with the shake method, so whatever floats your boat!
Upcoming:
On another depressing note, since I became allergic to bee stings this past summer and recently had an issue/reaction to my allergy shot AND we may be moving in the near future, I will be getting rid of my bees this Spring. Originally I thought I'd just sell everything and quit but I think I may decide to just move the hives to some friend's houses that have bees and at least I could live vicariously through their beekeeping and see how they progress. Lots of changes coming up but I guess that is what happens in life!
As always, thanks for reading.
Breakout sessions:
Our first breakout session was on swarm traps done by Matt Tannana. He was a very good speaker and managed the class questions very well. He does Top Bar hives and his swarm traps were all Top Bar style. His information followed the book Honeybee Democracy by Tom Seeley and he referenced the book a few times. I've read it before and I highly recommend it.
Our last session was Pests and Pathogens by Dr. Megan Milbrath. This is the same person from the Northern Bee Network that I bought queens from this past summer. She is also a very good speaker, natural and funny. She tried to be upbeat about a subject that can really be a downer for sure! My biggest takeaway from her session was a new approach to Varroa control. I have always been against treating the bees with chemicals and instead using Integrated Pest Management tools and looking for a genetic solution to pest problems. Well, she opened my eyes to a bit more of a middle ground that seems acceptable. The approach: If a hive has out of control mite levels, treat and then re-queen. The benefit here is: the hive doesn't die, you cycle through genetic combinations quicker to find the ones that work and you aren't creating a "mite bomb" when your hive crashes. So the remaining question is, if I decide to treat a select hive, what do I use? I think one of the Organic Acids is probably the way to go. I need to do more research.
Vendors:
It seems like every year there is some new gadget that shows up for beekeeping. This year it was the package funnel. Basically a piece of corrugated plastic that folds out into a funnel of sorts and instead of roughly dumping a package of bees into a hive, you gently invert the open package on top of this funnel on the outside of the hive and the bees just move down into the hive on their own. I suppose that would work just fine but I guess I've never had an issue installing them with the shake method, so whatever floats your boat!
Upcoming:
On another depressing note, since I became allergic to bee stings this past summer and recently had an issue/reaction to my allergy shot AND we may be moving in the near future, I will be getting rid of my bees this Spring. Originally I thought I'd just sell everything and quit but I think I may decide to just move the hives to some friend's houses that have bees and at least I could live vicariously through their beekeeping and see how they progress. Lots of changes coming up but I guess that is what happens in life!
As always, thanks for reading.
Saturday, February 20, 2016
2016-02-20: We're not dead yet!
On a balmy 55 degree February day I went out to see how the hives were doing. I'm happy to report that at least three out of the four are alive! The bees were using the top and bottom entrances on Yellow, Green and Split Hives.

Two items of concern came up and I walked around, both on the Split Hive. First, they were showing signs of possible Nosema or Dysentery, although I suppose it may have been their first cleansing flight of the winter.

The second odd thing was that the mouse guard that was stapled across the bottom entrance appears to have been torn open. I guess a skunk or something could have been clawing at it trying to get at some dead bees to eat?

Anyway, it was really good to see that most of the girls had made it this far. Hopefully White hive was just really sleepy and none of the bees wanted to come out to play!

Hang in there just a while longer girls!!

Two items of concern came up and I walked around, both on the Split Hive. First, they were showing signs of possible Nosema or Dysentery, although I suppose it may have been their first cleansing flight of the winter.

The second odd thing was that the mouse guard that was stapled across the bottom entrance appears to have been torn open. I guess a skunk or something could have been clawing at it trying to get at some dead bees to eat?

Anyway, it was really good to see that most of the girls had made it this far. Hopefully White hive was just really sleepy and none of the bees wanted to come out to play!

Hang in there just a while longer girls!!
Thursday, January 7, 2016
2016-01-07: Honey Bee Pollination
I'm a little late to the party but I came across this animation from National Geographic today about where honey bees are transported to do pollination across the country. Very impressive!
The overall article is about building a "super bee". Make sure to click the "featured article" link at the top to read more.
http://ngm.nationalgeographic.com/2015/05/building-bees/transport-map
On the home front there isn't too much going on. I put a "Winter Bee Kind" candy board that I received for Christmas on my Cutout hive. The cluster was at the top of the hive and they were moving around slightly in the 30 degree temps. I also put a home made, no cook candy board on the Nuc hive but I could not see the cluster in the top box and didn't have a light to shine down into the bottom box to see them. Since I left honey supers on the other two hives I am not adding candy boards to them. I continue to see new dead bees on the landing boards of the hives so that is a good sign. If there were no alive bees inside the hive, then there wouldn't bee any dead bees brought outside the hive!
My BroodMinder's continue to monitor and collect data from the hives. I had the battery die on two of them so far and I've replaced one of the batteries but haven't put the BroodMinder back out on the hive. The producers continue to work through the issues and make progress on the software so that is a good thing! They are starting work on a similar device that is a hive scale. That would be super useful! If it is anywhere close to the price of the BroodMinder then I'll be all over it!
Happy New Year readers!
The overall article is about building a "super bee". Make sure to click the "featured article" link at the top to read more.
http://ngm.nationalgeographic.com/2015/05/building-bees/transport-map
On the home front there isn't too much going on. I put a "Winter Bee Kind" candy board that I received for Christmas on my Cutout hive. The cluster was at the top of the hive and they were moving around slightly in the 30 degree temps. I also put a home made, no cook candy board on the Nuc hive but I could not see the cluster in the top box and didn't have a light to shine down into the bottom box to see them. Since I left honey supers on the other two hives I am not adding candy boards to them. I continue to see new dead bees on the landing boards of the hives so that is a good sign. If there were no alive bees inside the hive, then there wouldn't bee any dead bees brought outside the hive!
My BroodMinder's continue to monitor and collect data from the hives. I had the battery die on two of them so far and I've replaced one of the batteries but haven't put the BroodMinder back out on the hive. The producers continue to work through the issues and make progress on the software so that is a good thing! They are starting work on a similar device that is a hive scale. That would be super useful! If it is anywhere close to the price of the BroodMinder then I'll be all over it!
Happy New Year readers!
Tuesday, December 8, 2015
2015-12-08: BroodMinder Has Arrived
I'm very excited to say that my electronic hive temperature and humidity monitoring devices, aka the BroodMinder, have arrived! If you've been reading this blog you know that I've been playing around with my own electronic hive monitoring electronics using an Arduino. Although it worked, I couldn't really find a good way of deploying it and keeping it powered. Well, some very talented people have done a lot more (and better) thinking about this and have made it a reality. The weather is looking good this weekend and hopefully I will have them installed!
You can read all about how they work in the link to their Indiegogo page above, but basically you place the device right below your inner cover (above the brood) and using low power blue tooth it transmits the data to an app on your smart phone. Pretty sweet!
I bought three of them and plan to place them on the cutout hive, the split (combined) hive and either the Green or White hive. They both have the same number of boxes but one has an Italian queen and the other has the queen I bought from the Northern Bee Network. I guess you'll find out which one I decided on after I deploy them.
Hopefully these little gems will help me to monitor the hives over the winter without opening them.
Until next time, thanks for reading!
You can read all about how they work in the link to their Indiegogo page above, but basically you place the device right below your inner cover (above the brood) and using low power blue tooth it transmits the data to an app on your smart phone. Pretty sweet!
 |
| BroodMinders ready to go! |
 |
| The App |
Until next time, thanks for reading!
Monday, November 23, 2015
2015-11-21: Winter Is Here
I guess there is no avoiding it now.......Winter is here. Our first real snow that stuck started today and hasn't stopped yet. Not sure if the snow will last but there is no denying that we are sliding into the cold. Some of the things I wanted to do to the hives before Winter set in for good was to add mouse guards, windbreaks, candy boards and/or ventilation boards.
After searching around on the interwebs and seeing many different schemes for windbreaks, I decided on using burlap. It was cheap and could be used for other purposes once Winter was over. I picked up two rolls, hammered some posts into the ground and rolled out the burlap using zip ties to attach it to the posts.
The idea isn't to surround the hives, but to address the prevailing wind directions. Typically this is wind from the North and West so I built it in those two directions. With my cutout hive and my combined nuc hive being short, the three foot tall roll seemed adequate. But for the two established hives with two deep boxes and one honey super on, it seemed too short. I think I'm going to pick up a few taller stakes and two more rolls of burlap to complete the job.
My next task was to put on some mouse guards. I took some #4 hardware cloth, bent it into an L shape and stapled them across the entrance to each of the hives.
All in all I think it turned out well, didn't take too long and was inexpensive. I sure hope it helps the bees get through the next four months of Winter!
Until next time, Happy Thanksgiving and thanks for reading!
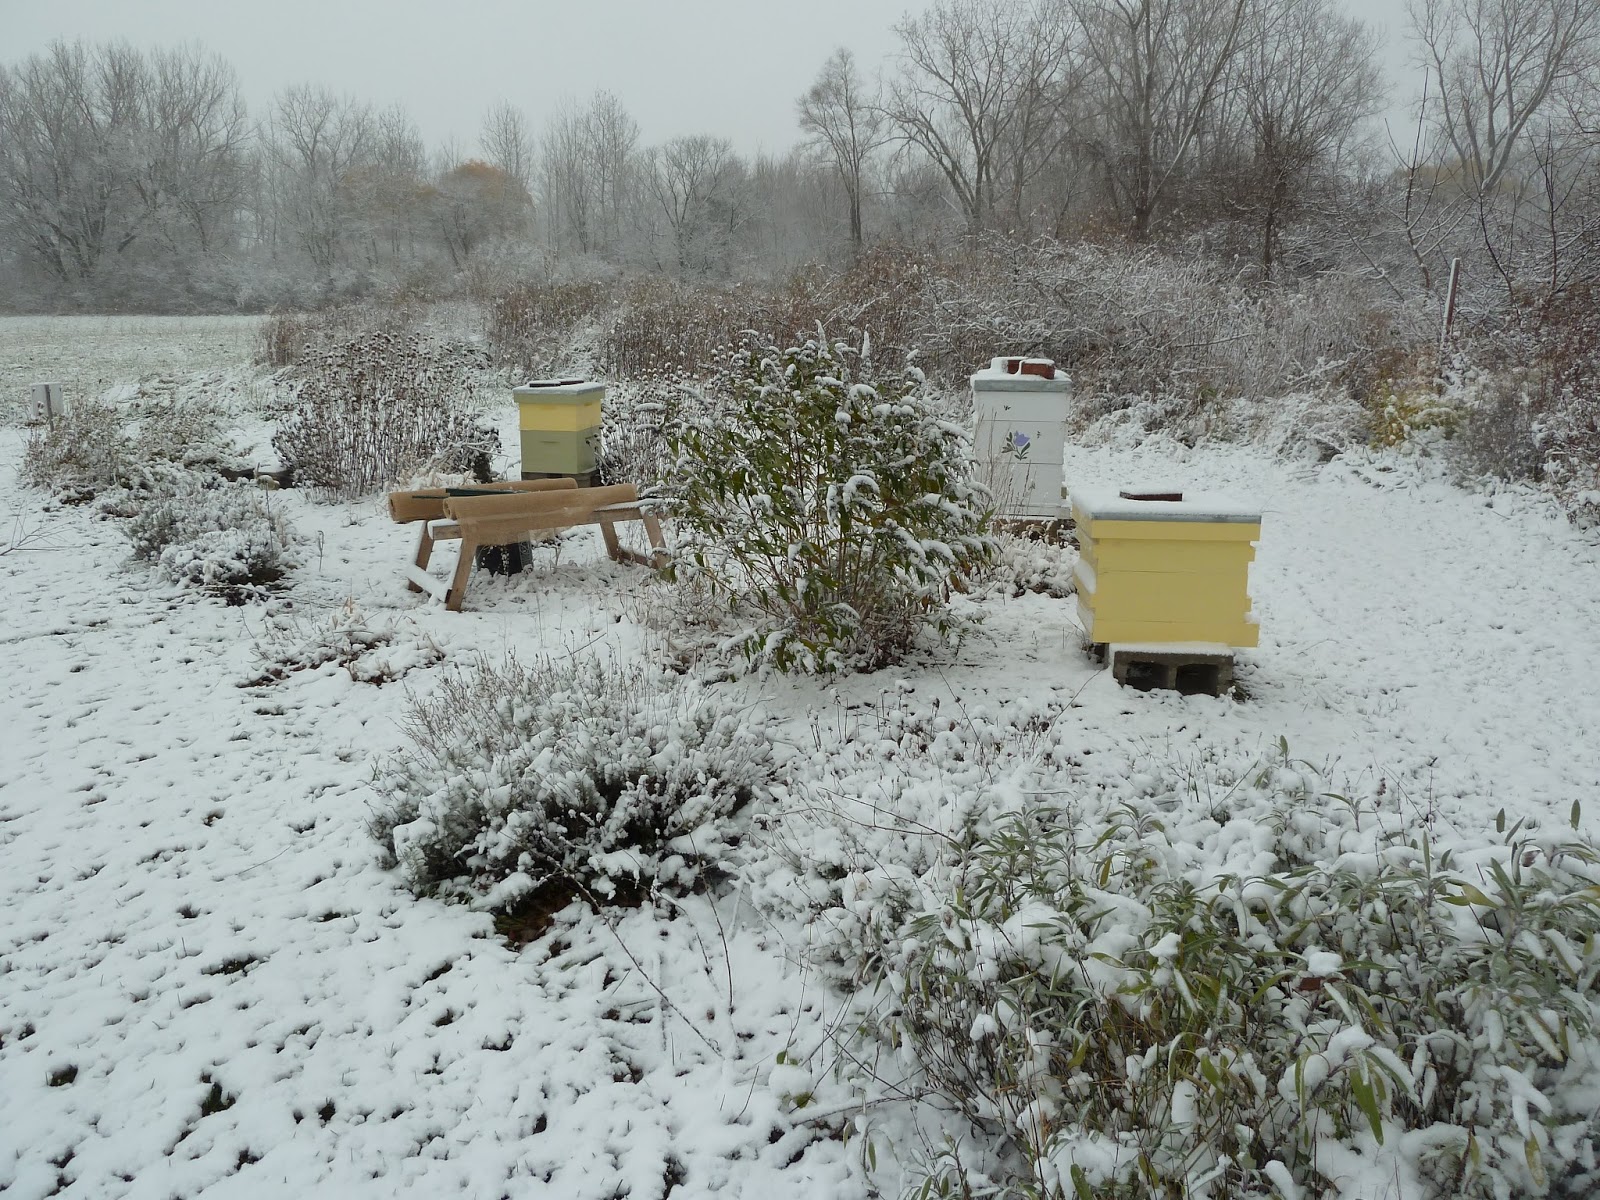 |
| Cold hives! |
 |
| Wind break added |
My next task was to put on some mouse guards. I took some #4 hardware cloth, bent it into an L shape and stapled them across the entrance to each of the hives.
 |
| Cut out hive with mouse guard added |
 |
| White and Green hives with mouse guards added |
 |
| Combined nuc hives with mouse guard added |
Until next time, Happy Thanksgiving and thanks for reading!
Monday, October 26, 2015
2015-10-25: Winter Prep
We've finally hit a few nights of freezing temps so that means it is time to complete any winter prep that needs to be done on the hives. I have empty feeder jars that need to be removed, boxes with no stores in them that need to be taken off (the bees don't need a bunch of extra space that serves no purpose) and mouse guards to be placed on. I also need to decide what to do with my newly established nuc hives.
Old Nucs - Yellow/Green hives:
These are the splits I made some time ago that were moved into full sized boxes last month. They've been feed 2 quarts of syrup each in the hopes that they would draw the empty frames with wax and start filling them up. If I found 10 good frames then I was thinking to take two nuc bodies (5 frames each) and stack them. It is suppose to be easier for the bees to move up in the winter and it would be easier for the bees to cover 5 frames at a time instead of 10.
Yellow Nuc:
I had suspicions during the last inspection that I had waited too long to transfer this nuc to a full sized hive and they decided to swarm (I saw some torn open queen cells). The bees seemed "flighty" and the only brood I saw were drones. The number of drones walking around the frames was high, especially since they should all be kicked out of the hive by now! I did spot some eggs and developing larva but something was telling me that this was not right.
So, either I have the start of laying workers or I have a queen laying all drones. On top of that, the bees had not touched a single new frame that I had placed into the hive. Stay tuned for more on the Yellow Nuc during my inspection of the Green Nuc....
Green Nuc:
I was a bit annoyed after pulling the first few frames since the bees had not touched them at all. Thankfully the original 5 frames that were moved into the hive looked pretty good. Lots of capped honey and worker brood! Two more frames in and I spotted the queen with her pretty green dot.
I was even nicely surprised that after I moved past these 5 frames the bees were actually drawing out one of the new frames!
Have I mentioned how I love festooning bees before? =)
Based on my findings between both nucs, I decided the one was probably queenless and had the start of laying workers and the other was queen right. I thought it would be a good idea to take two 5 frame nuc boxes and stack them with the best frames from each hive. I unscrewed the bottom from one of the nuc boxes and stacked it on top of another nuc box. Crap! They are not made to stack. There was a large gap between the two that would be open to the air. Ugh. I guess I need to deal with the full sized boxes instead. I decided to do a newspaper combine and thankfully I had one sheet of newspaper left! I placed it across the top of Green nuc, picked up the Yellow nuc off of its bottom board and placed it on top of the Green nuc. The bees will eventually chew through the paper and this slow integration will hopefully prevent any fighting between the bees before they merge together into one happy family. I'm just hoping that there wasn't some drone laying queen that I didn't spot in the Yellow nuc that ends up battling with Green nuc's queen.
Yellow Hive:
This is my cutout hive that has made some really good progress over the summer. I removed the empty feeder jar and took a look through the top box. The bees were covering about 6 frames and had most of them drawn out.
Quite a few were filled with capped honey. Looking down into the box below I saw lots of bees and some rubber bands still on the frames from the cutout!! They typically chew through them and dispose of them but I'm guessing they've propolised them right onto the frames now. I'll have to remove them during the first inspection in the Spring.
Green Hive:
The top honey super on this hive was filled with drawn combs that were completely empty. I thought for sure that when I added them that the bees would fill them quickly with the Goldenrod flow. No such luck. I pulled this box off after clearing a few stray bees off the frames. I pulled a few frames from the next honey super and at least there was some capped honey there. Looks like that box will stay on for the Winter.
White Hive:
Looking at the top honey super on this hive I could see that it was packed. I knew this from my last inspection but I had also seen a large pile of dead bees in front of the hive. I was concerned that this hive had been robbed out by other bees. Well not a single frame of honey appeared to be touched so this hive should have some great stores going into Winter. It also had a nice population of bees and when I looked closely at the pile of dead bees I saw numerous dead yellow jackets in the pile. Maybe they tried to raid the hive and picked the wrong one to screw with!
To complete my tasks I needed to put the mite sampling boards back into the hives that had screened bottoms to prevent any wind drafts blowing up from the bottom of the hives. With that done I also wanted to put my mouse guards on but with the entrance reducers on it didn't really look like they would fit properly. Based on http://www.honeybeesuite.com/what-size-hardware-cloth-is-best-for-beehives/ it looks like #4 hardware cloth is the proper size for a mouse guard. So I think I'll grab some and use that instead.
I'm also considering getting or building some candy boards that come with a top entrance. This would allow the bees to leave the hive for a cleansing flight during the Winter if the bottom entrance happened to be plugged up with dead bees.
With four hives going into Winter and some diversified genetics (one Italian, one cutout wild open mated and two "northern" queens), I'm hoping to have some better luck overwintering this year. Wish for a mild Winter and wish the girls luck!
Until next time, thanks for reading!
Old Nucs - Yellow/Green hives:
These are the splits I made some time ago that were moved into full sized boxes last month. They've been feed 2 quarts of syrup each in the hopes that they would draw the empty frames with wax and start filling them up. If I found 10 good frames then I was thinking to take two nuc bodies (5 frames each) and stack them. It is suppose to be easier for the bees to move up in the winter and it would be easier for the bees to cover 5 frames at a time instead of 10.
Yellow Nuc:
I had suspicions during the last inspection that I had waited too long to transfer this nuc to a full sized hive and they decided to swarm (I saw some torn open queen cells). The bees seemed "flighty" and the only brood I saw were drones. The number of drones walking around the frames was high, especially since they should all be kicked out of the hive by now! I did spot some eggs and developing larva but something was telling me that this was not right.
 |
| Drones, lava and eggs but no queen |
So, either I have the start of laying workers or I have a queen laying all drones. On top of that, the bees had not touched a single new frame that I had placed into the hive. Stay tuned for more on the Yellow Nuc during my inspection of the Green Nuc....
Green Nuc:
I was a bit annoyed after pulling the first few frames since the bees had not touched them at all. Thankfully the original 5 frames that were moved into the hive looked pretty good. Lots of capped honey and worker brood! Two more frames in and I spotted the queen with her pretty green dot.
 |
| Queen with a pretty green dot |
I was even nicely surprised that after I moved past these 5 frames the bees were actually drawing out one of the new frames!
 |
| Drawing out a frame with new wax |
 |
| Festooning bees |
 |
| Newspaper combine complete |
 |
| Where did that orange pollen come from? |
This is my cutout hive that has made some really good progress over the summer. I removed the empty feeder jar and took a look through the top box. The bees were covering about 6 frames and had most of them drawn out.
 |
| Yellow Hive bees |
Quite a few were filled with capped honey. Looking down into the box below I saw lots of bees and some rubber bands still on the frames from the cutout!! They typically chew through them and dispose of them but I'm guessing they've propolised them right onto the frames now. I'll have to remove them during the first inspection in the Spring.
Green Hive:
The top honey super on this hive was filled with drawn combs that were completely empty. I thought for sure that when I added them that the bees would fill them quickly with the Goldenrod flow. No such luck. I pulled this box off after clearing a few stray bees off the frames. I pulled a few frames from the next honey super and at least there was some capped honey there. Looks like that box will stay on for the Winter.
White Hive:
Looking at the top honey super on this hive I could see that it was packed. I knew this from my last inspection but I had also seen a large pile of dead bees in front of the hive. I was concerned that this hive had been robbed out by other bees. Well not a single frame of honey appeared to be touched so this hive should have some great stores going into Winter. It also had a nice population of bees and when I looked closely at the pile of dead bees I saw numerous dead yellow jackets in the pile. Maybe they tried to raid the hive and picked the wrong one to screw with!
 |
| Battle aftermath |
I'm also considering getting or building some candy boards that come with a top entrance. This would allow the bees to leave the hive for a cleansing flight during the Winter if the bottom entrance happened to be plugged up with dead bees.
With four hives going into Winter and some diversified genetics (one Italian, one cutout wild open mated and two "northern" queens), I'm hoping to have some better luck overwintering this year. Wish for a mild Winter and wish the girls luck!
Until next time, thanks for reading!
Friday, September 18, 2015
2015-09-17: Hive Inspection
I had a number of tasks that needed to be accomplished for a while now. My top priority was to get the nuc hives transferred to full sized hive bodies so they can build up enough stores to last the Winter. I'm hoping they can both build up to two full deeps in time. Believe it or not, Winter is coming. Especially in honey bee terms. Second on my list was to make sure the cutout hive is built up to four full medium boxes. Last on my list was to check the status of Green Hive's honey supers and if the top one was full remove it for processing. I have to thank Byron for coming out to help me again. Having an extra set of hands is always appreciated!
Nuc hives:
The nucs are each currently resting on a single cinder block. So we had to throw down another cinder block and level it to the existing one to make room for the full sized hive bodies. Byron was able to unstrap each nuc and move it a few feet out of the way while I set the other block in place and checked it for level. With a little adjusting and stomping on the blocks, they were level. The new hives were set in place and frames removed to make room for the five frames from the nucs. All that was left was to remove the frames from the nucs and put them into the new hives.
This went really fast since I wasn't really focused on inspecting every frame. But I did notice a number of queen cups and what looked to be a torn open queen cell on one of the frames.
I did not spot the queen during the transfer of these five frames. It is quite possible that they actually swarmed....taking my new purchased queen with them. She should have been easy to spot since she was marked. I'll need to check this one closely next time and see if I can spot the marked queen or if they requeened themselves. If they did swarm there isn't much hope for that swarm to establish and overwinter this late in the year.
After we finished moving the frames over, the inner cover went on and a jar of sugar syrup went on top of that to feed them. This should give them the sugar they need to draw out the empty frames in the new hive.
The second nuc went just as quickly. Thankfully this time I was able to spot the queen and there were no queen cups to be found on any of these frames. Can you find her in the picture below?
The were some really nice frames in both nuc hives with plenty of honey and pollen. Hopefully they have the resources to increase their populations and expand like crazy!
Cutout Hive:
We opened up the cutout hive and checked to see how many of the existing frames had been drawn out. I was a little bummed to see that they only had about 7 of the frames drawn. I thought for sure with all the Goldenrod blooming around my house that they would have tons of nectar to make wax and honey. Maybe these bees don't like the smell of sweaty gym socks because that is what Goldenrod nectar smells like!
I decided to add the fourth box to the hive and put a sugar syrup feeder on as well. Go bees go!
Green Hive:
A quick look into the top honey super on this hive did not give me what I wanted. The entire super had only one frame with any honey in it and a number of the frames were still undrawn. Looks like no honey for harvest this year. The second honey super wasn't much better. That box was given all drawn frames and there were only a few frames with any honey or nectar in them at all. I'll probably have to combine the best frames from the two honey supers into one box and feed this hive too.
White Hive:
This hive has one honey super on it and I expected to see the same lack of use. I was so glad to be wrong!! The bees had this super completely filled and capped. Since this hive was the only one that wasn't requeened this year, I wonder if that is why they were able to make a surplus. I know of a beekeeper's saying that may explain this - "You can make honey or bees but not both".
What's Next:
I will check the hives in a week to see how much of the feed they consumed and how many of the frames they are building up.
Until next time, thanks for reading!!
Nuc hives:
The nucs are each currently resting on a single cinder block. So we had to throw down another cinder block and level it to the existing one to make room for the full sized hive bodies. Byron was able to unstrap each nuc and move it a few feet out of the way while I set the other block in place and checked it for level. With a little adjusting and stomping on the blocks, they were level. The new hives were set in place and frames removed to make room for the five frames from the nucs. All that was left was to remove the frames from the nucs and put them into the new hives.
 |
| Byron transferring frames |
 |
| Queen cups |
After we finished moving the frames over, the inner cover went on and a jar of sugar syrup went on top of that to feed them. This should give them the sugar they need to draw out the empty frames in the new hive.
The second nuc went just as quickly. Thankfully this time I was able to spot the queen and there were no queen cups to be found on any of these frames. Can you find her in the picture below?
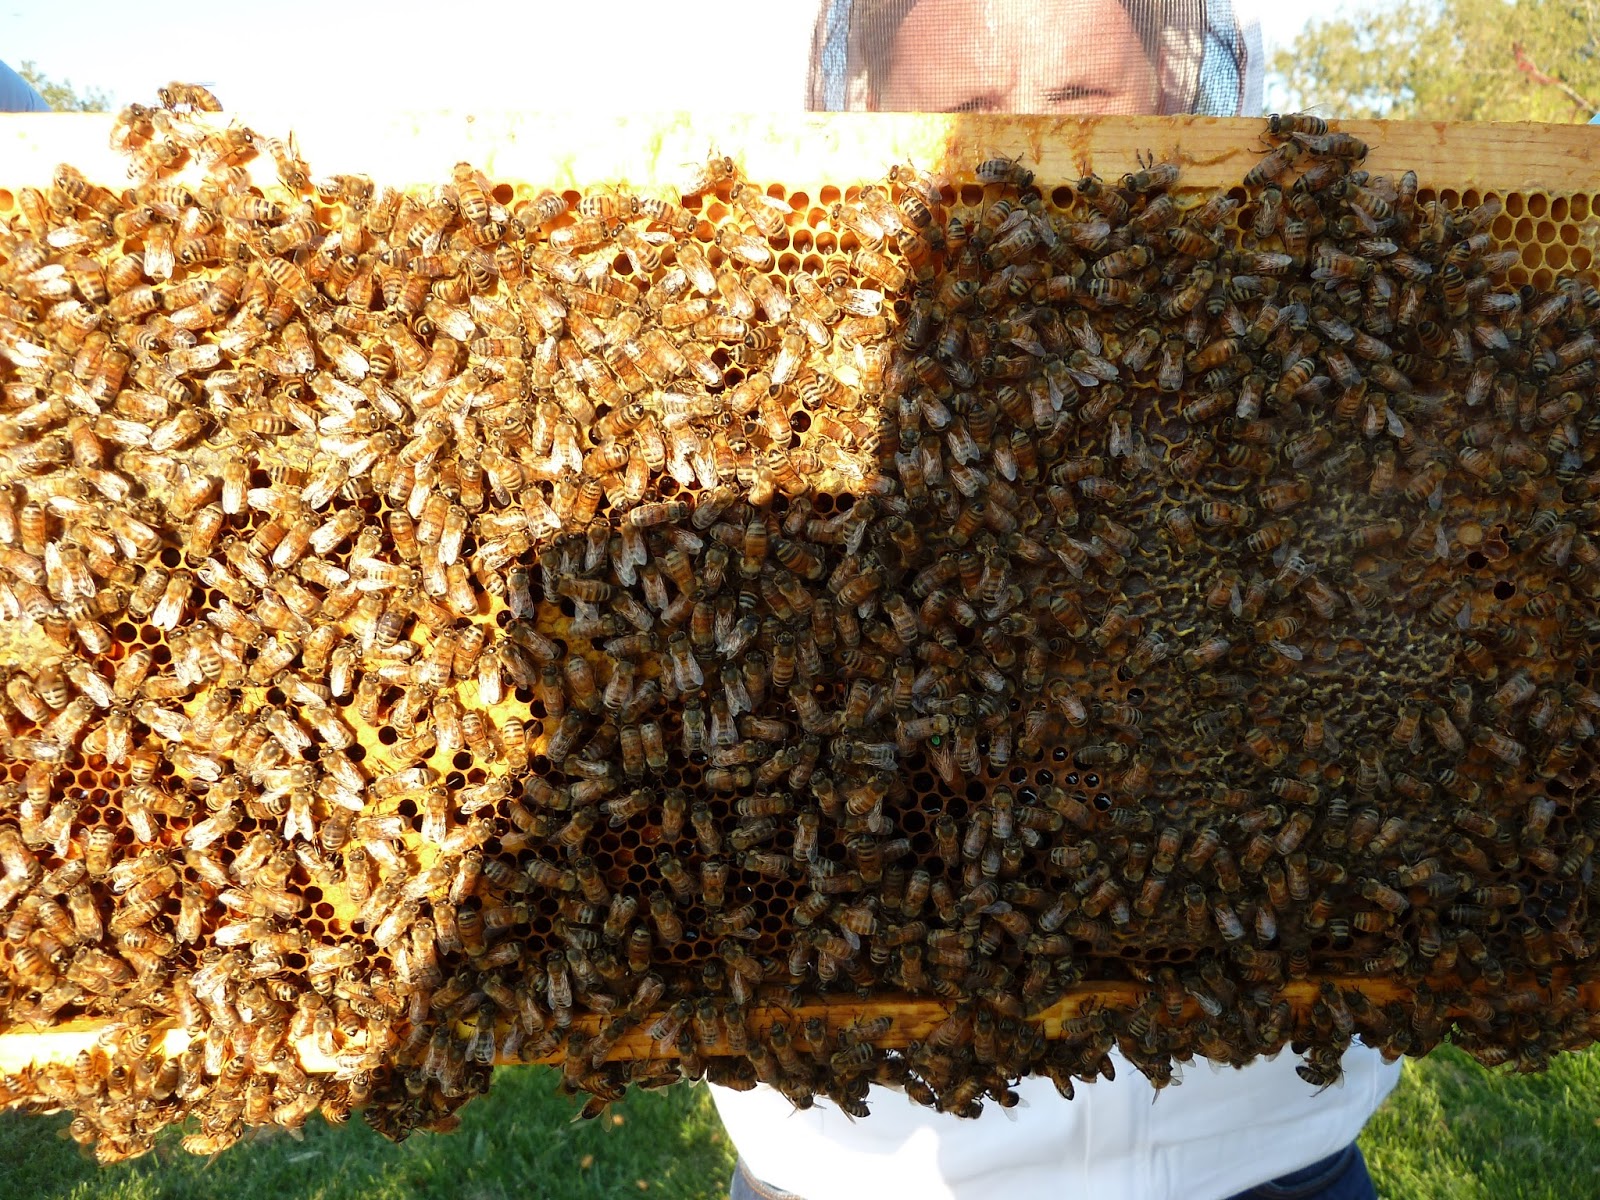 |
| Spot the queen with the green dot on her back! |
 |
| Drawn frame with honey and capped brood |
We opened up the cutout hive and checked to see how many of the existing frames had been drawn out. I was a little bummed to see that they only had about 7 of the frames drawn. I thought for sure with all the Goldenrod blooming around my house that they would have tons of nectar to make wax and honey. Maybe these bees don't like the smell of sweaty gym socks because that is what Goldenrod nectar smells like!
I decided to add the fourth box to the hive and put a sugar syrup feeder on as well. Go bees go!
Green Hive:
A quick look into the top honey super on this hive did not give me what I wanted. The entire super had only one frame with any honey in it and a number of the frames were still undrawn. Looks like no honey for harvest this year. The second honey super wasn't much better. That box was given all drawn frames and there were only a few frames with any honey or nectar in them at all. I'll probably have to combine the best frames from the two honey supers into one box and feed this hive too.
White Hive:
This hive has one honey super on it and I expected to see the same lack of use. I was so glad to be wrong!! The bees had this super completely filled and capped. Since this hive was the only one that wasn't requeened this year, I wonder if that is why they were able to make a surplus. I know of a beekeeper's saying that may explain this - "You can make honey or bees but not both".
What's Next:
I will check the hives in a week to see how much of the feed they consumed and how many of the frames they are building up.
Until next time, thanks for reading!!
Thursday, August 20, 2015
2015-08-20: Allergy Confirmed
Finally had my allergy test done and lucky me I'm allergic to honey bee venom!
The test involved a series of small (very small really) injections of venom from the insects of the hymenoptera order. I believe 8 different insect venoms were involved in ever increasing potency. I had no reactions to any of them until the doctor hit 1:100 strength of the honey bee venom. He continued on to full strength with all the other venoms and I had no reaction to any of them. Why honey bees why?!?
The good news is that next week I will start the allergy shots. Once a week for ten weeks. I believe they increase the venom dosage each time. After ten weeks if I show no signs of a reaction then they send in a blood sample. If it comes back that I have no immune response then I'm "cured". I would still need to keep going back for a shot once a month for the next five years to keep my body in tune with the venom. The main thing I'm focused on now is the ten week goal. I guess that would put me at the end of October. Just in time for me to be doing nothing with the bees! Hahahah =)
Let the countdown begin!
The test involved a series of small (very small really) injections of venom from the insects of the hymenoptera order. I believe 8 different insect venoms were involved in ever increasing potency. I had no reactions to any of them until the doctor hit 1:100 strength of the honey bee venom. He continued on to full strength with all the other venoms and I had no reaction to any of them. Why honey bees why?!?
The good news is that next week I will start the allergy shots. Once a week for ten weeks. I believe they increase the venom dosage each time. After ten weeks if I show no signs of a reaction then they send in a blood sample. If it comes back that I have no immune response then I'm "cured". I would still need to keep going back for a shot once a month for the next five years to keep my body in tune with the venom. The main thing I'm focused on now is the ten week goal. I guess that would put me at the end of October. Just in time for me to be doing nothing with the bees! Hahahah =)
Let the countdown begin!
Thursday, August 13, 2015
2015-08-10: Back In The Game
After my rather dramatic post last time, I just couldn't wait anymore and had to get out to see the bees. I armed myself with some Benadryl, my EpiPen and my friend Keith and headed out to do some inspections! I actually donned the FULL bee suit as well, which I haven't worn since I did the shed cut-out. Dang is that thing hot! My goals were to check and see if the cut-out hive had successfully re-queened themselves and to check the nuc hives to see how they were doing with the new queens in them.
Cut-Out Hive / Yellow Hive:
I had Keith do all the work and I just barked orders the entire time. Thankfully Keith is a really good sport and was happy to help me out. He removed the cover, took off the extra boxes that were covering the honey feeder and got into the first box. The bees were pretty sparse here and there were only a few frames with any wax drawn at all. And even those frames only had a few spots on them with any wax. That box came off and we were into the next box. Slightly more wax built out in this box but about half the frames were still untouched. Finally after getting to the last three frames we were able to see some good drawn frames.
About 3/4 of the frame was drawn and there was some capped honey and some nice pollen in the cells. The next frame was very similar and I was able to spot some larva scattered here and there. This was the first good sign that a queen was present. We grabbed the last frame and look who we spotted!
She's a beauty! Look at how dark she is. She definitely has some non-Italian genetics in her. I'm hoping she has "Winter Survivor" written all over her! I followed her around with the camera for a bit and if you zoom in on this photo you can see she has eggs in every cell. Good job!
At this point I really didn't need to go into the last box since I know they were able to re-queen themselves. I had Keith take a few frames from the top box that had some wax on them and swap them with some of the frames that had no wax on them. Then we removed the top box entirely. They have a lot of wax to draw still and they don't really need that extra space to police. I also decided that since there weren't really a lot of bees in the hive that I would put the entrance reducer on. We are probably due for a nectar dearth and I don't want the strong neighboring hives to bust in and rob this hive out. I'll probably make up some syrup to feed them and this should get them to draw out some more wax. I need them to fill out three medium boxes before Winter sets in.
Speaking of Winter, I see the Goldenrod starting to bloom in my area. That always signals the approach of Fall. Many of my late blooming flowers are also in full bloom.
Green Nuc:
Since my Nuc hives only have 5 frames, it makes them really quick and easy to check. Most of the honey frames that I put in are still full. They have eaten a little bit and replaced it with pollen which is a good thing. Two frames in and we hit the first solid brood frame. The new queen looks like she is settling in nicely!
The very next frame over I was able to spot her majesty. The green dot on her back makes it a little too easy to spot her.
This hive is doing pretty well with two frames of brood front and back and two frames of honey and pollen. The one empty frame I had given them sadly remained empty. They had a few blobs of comb ridges created but I didn't care too much for them. I had Keith scrape some it off the frame. I'm hoping when all these sealed brood start hatching out that there will be a lot of new bees that will be primed to start drawing wax. I need to get busy building some boxes so I can move these nucs into full sized hives soon.
Yellow Nuc:
Very similar to the Green Nuc. Two honey frames that the bees had eaten a little from and replaced with either pollen or more nectar. Two pretty solid frames of capped brood.
This hive seemed to be much more interested in drawing some comb on the new plastic frames though.
Since this was a medium sized frame that I placed into a deep sized box, the bees have drawn comb off the bottom of the frame to fill in the space. Bees are sure efficient!
On the opposite side of this frame they decided to draw a few of the same ridges I described in the last nuc. At least they've drawn plenty of normal looking comb too.
I'm wondering if they were just stealing wax from one part of the comb to make this instead of drawing new wax?
We spotted the queen on the next frame and that was the last thing I needed to see. This was a very successful inspection.
Next Steps:
I plan on making some 1:1 sugar syrup to feed to the hives trying to draw new wax. I need to get the full sized boxes ready to move the nucs into. I also need to give Green Hive a check to see how much of the two honey supers they have filled and also to see if the new queen is doing alright in there as well. I'd also like to do some Varroa monitoring with a powdered sugar shake. That sounds like a lot to do and we are already half way through August!
As always, thanks for reading!
Cut-Out Hive / Yellow Hive:
I had Keith do all the work and I just barked orders the entire time. Thankfully Keith is a really good sport and was happy to help me out. He removed the cover, took off the extra boxes that were covering the honey feeder and got into the first box. The bees were pretty sparse here and there were only a few frames with any wax drawn at all. And even those frames only had a few spots on them with any wax. That box came off and we were into the next box. Slightly more wax built out in this box but about half the frames were still untouched. Finally after getting to the last three frames we were able to see some good drawn frames.
 |
| Plastic Frames being filled |
 |
| Cut Out has a new Queen! |
 |
| New Queen and Eggs |
Speaking of Winter, I see the Goldenrod starting to bloom in my area. That always signals the approach of Fall. Many of my late blooming flowers are also in full bloom.
 |
| Coneflowers in bloom |
Since my Nuc hives only have 5 frames, it makes them really quick and easy to check. Most of the honey frames that I put in are still full. They have eaten a little bit and replaced it with pollen which is a good thing. Two frames in and we hit the first solid brood frame. The new queen looks like she is settling in nicely!
 |
| Solid brood pattern |
 |
| Queenie |
Yellow Nuc:
Very similar to the Green Nuc. Two honey frames that the bees had eaten a little from and replaced with either pollen or more nectar. Two pretty solid frames of capped brood.
 |
| Capped brood on Honey Super Cell plastic frames |
 |
| New comb and brood |
On the opposite side of this frame they decided to draw a few of the same ridges I described in the last nuc. At least they've drawn plenty of normal looking comb too.
 |
| Comb ridges |
We spotted the queen on the next frame and that was the last thing I needed to see. This was a very successful inspection.
Next Steps:
I plan on making some 1:1 sugar syrup to feed to the hives trying to draw new wax. I need to get the full sized boxes ready to move the nucs into. I also need to give Green Hive a check to see how much of the two honey supers they have filled and also to see if the new queen is doing alright in there as well. I'd also like to do some Varroa monitoring with a powdered sugar shake. That sounds like a lot to do and we are already half way through August!
As always, thanks for reading!
Monday, August 3, 2015
2015-08-01: Sting Reaction
I was showing my son-in-law some of my hives this past weekend when a poorly navigating bee landed behind my ear and accidentally stung me. First off, if you watch bees fly for any length of time it can be quite hilarious how badly they seem to fly at times. Secondly, it is obvious that one of my bees would never sting me on purpose, so therefore she must have accidentally got her stinger caught in my epidermis! Believe what you want folks =) Anyway, I scraped out the stinger and walked back up to the house. All the time being "escorted" back by another bee. When I got into the house I felt a bit itchy and soon noticed I had red splotches all over my chest and even some hives around my waistline. Not good. This is where the phrase "severe reaction" enters into the story. Any kind of reaction outside of the sting area and anything more than your typical redness, swelling and/or itching. Matter of fact, if you start looking on WebMD then you are getting into the anaphylaxis symptoms. Trying not to panic at this point I took some Children's Benadryl that I had in the house and then showed my wife what was going on. We decided to wait and see if the Benadryl took care of it since I wasn't having any other anaphylaxis symptoms. Within a few hours the reaction had gone away and I started to relax a bit. I went to the doctor the next day and she immediately called in an EpiPen for me and made me an appointment with the Allergist. At this point I'm kind of freaking out and thinking that I have to give up beekeeping if I'm deathly allergic to them. But I'm going to try and put off judgement until I get some more solid answers from the Allergist. Quite an emotional roller coaster so far. I am a little relieved to read on some beekeeping forums of quite a few other people that experienced the same thing. Many of them were able to undergo desensitization therapy until they had no more reactions to stings. So, I guess there is hope for me yet <sigh>.
Thursday, July 16, 2015
2015-07-15: Cut Out Hive and New Queens!
I've finally accomplished two of the goals I set for this year: split my hives and get some better genetics with some Michigan raised "survivor" queens! I learned about the Northern Bee Network at the Michigan Beekeepers conference in the Spring, so I went through their list of Queen breeders and found one that followed practices I conform to. I placed an order for three queens and on Wednesday morning I received a phone call at 6 AM from the post office telling me to come get my bees.
The Splits:
The basic concept of how I was going to do my splits was to select two frames of open/capped brood and two frames of honey/pollen from the donor hive and place them into the 5 frame nuc box. The remaining frame would be an empty frame with plastic foundation with the new queen cage on it. Key number one is making sure you don't accidentally transfer your existing queen into the new hive!
I began in Green Hive by quickly scanning a few frames in the honey supers just to see how they were doing. Almost every frame of foundation was drawn and filled with nectar. They are doing great! I then removed the two honey supers and started going through the brood boxes. The first few frames on the outside were solid honey. After I made a few adjustments to the bulges in the comb, I transferred them to the nuc box. Two honey frames done. Now to find the brood frames and the queen. Next few frames had some eggs and a lot of honey so I didn't take them. Frame five had some nice capped brood, so I meticulously studied it looking for the queen. Flipped the frame over and looked for her again. Back and forth two more times after that and I was satisfied she wasn't there. I walked over to put it into the nuc and checked it one more time. In it went. Frame number six was another good brood frame. Looking....looking....flip....looking....bam! There she is hiding in the gap between the frame and the comb. Each time I flipped the frame she'd run back to the other side. Sneaky! I took a queen marking cup my wife had bought for me and scooped her up into it and set her off to the side (more on this later).
I took this frame and into the nuc it went. I pulled out the first queen cage and the queen looked alive and well inside. I then noticed it had a piece duct tape over the end.
I assumed the duct tape was to prevent the candy from being eaten by the bees during shipment, but since the end is stuck down into a hole in the shipping cage, I'm not really sure how they would get to it. Anyway, I removed the tape, exposed the candy and wedged the cage in between two of the frames. First nuc complete! I took another one of the queen cages and put her into the donor hive and closed it up.
The second nuc was a bit more difficult. After pulling off the honey super I went through the entire first brood box and only found one good frame of honey and one good frame of brood. I did spot the queen and made sure that frame was out of the way. I had to go into the bottom box to look for two more frames. Generally I don't really go into the bottom box unless I really have to. You always end up crushing some bees when moving boxes around and they are also really heavy! Thankfully I pulled the first frame in the bottom box and it was solid honey. Into the nuc with you! The next frame was a fantastic brood frame! Nuc #2 was complete with the added plastic frame and queen cage. I replaced the frames from the donor hive with the same empty plastic frames and put the boxes back together.
This all sounds pretty simple but all told it took about 3.5 hours!
Requeening:
Remember that queen I had removed and put into the marking cup? Well, the reason I removed her from the hive was because I was noticing many signs from this hive of what I think is Chronic Bee Paralysis Virus. The characteristic symptoms are bees with a greasy black shiny appearance, trembling bees unable to fly, clusters of bees walking on the ground and healthy bees trying to drag the sick bees out of the hive. I was able to spot all of these symptoms.
This disease is typically vectored in from the dreaded Varroa mite. I haven't done mite counts yet this year but when I do I wouldn't be surprised to see a higher count in this hive. Since they don't have treatments for this disease, the recommendation is to requeen the hive. This will give some new genetics that hopefully won't be as susceptible to the disease, as well as giving a break in the brood cycle while the new queen is being released and eventually begins to lay eggs. The break in the bee's brood cycle also gives a break to the Varroa mite's cycle as well since they only reproduce in capped brood.
So as far as requeening goes, putting a new queen into the hive is one thing. Removing the old queen is another. And dispatching the old queen yet another. Is it sad that I was getting all worked up over having to kill the old queen? Well, I couldn't get myself to just "pinch" her. Since you can make a swarm lure by soaking dead queens in alcohol, I though about just tossing her into a jar of alcohol. But the thought of drowning freaks me out so I couldn't do that either. I finally decided to put her in the refrigerator. If it is anything like dying from hypothermia, then slowly "going to sleep" from the cold might not be such a bad way to go. I hope it works that way anyway! Green Hive queen is dead. Long live the new queen!
Cut Out Hive:
The bees from the cut out seem to be settling into their new home, Yellow Hive. I have fed them two mason jars filled with honey so far to make up for all the honey I stole from them during the cut out. I found the girls have done a really good job of attaching the combs rubber banded into the frames. And they've started to chew through the rubber bands as well.
There are plenty of larva on the frames as well as nectar and pollen so that is a good sign. The not so great sign is that I did NOT get the queen. Here is the evidence:
I spotted numerous capped and uncapped emergency queen cells across a number of frames. Probably around 8 in total. The good thing is that at least they had some viable larva that they could start turning into queens. I had thought about ordering another queen to place into this hive but since they already have some capped cells, I decided to let them raise their own queen. A capped queen cell should emerge in about 8 days from now. Twelve days after that (assuming she has good weather for her mating flights and doesn't get eaten by a bird) she should be laying eggs. So, sometime in mid August Yellow Hive should be back in action again!
Next Steps:
I'll be checking the hives to make sure the new queens have been released in a few days. After that I will do another full inspection to make sure there are new eggs and larva. I'll plan on doing some mite sampling at that time as well.
Until then.......thanks for reading!
 |
| Three Queens |
The basic concept of how I was going to do my splits was to select two frames of open/capped brood and two frames of honey/pollen from the donor hive and place them into the 5 frame nuc box. The remaining frame would be an empty frame with plastic foundation with the new queen cage on it. Key number one is making sure you don't accidentally transfer your existing queen into the new hive!
I began in Green Hive by quickly scanning a few frames in the honey supers just to see how they were doing. Almost every frame of foundation was drawn and filled with nectar. They are doing great! I then removed the two honey supers and started going through the brood boxes. The first few frames on the outside were solid honey. After I made a few adjustments to the bulges in the comb, I transferred them to the nuc box. Two honey frames done. Now to find the brood frames and the queen. Next few frames had some eggs and a lot of honey so I didn't take them. Frame five had some nice capped brood, so I meticulously studied it looking for the queen. Flipped the frame over and looked for her again. Back and forth two more times after that and I was satisfied she wasn't there. I walked over to put it into the nuc and checked it one more time. In it went. Frame number six was another good brood frame. Looking....looking....flip....looking....bam! There she is hiding in the gap between the frame and the comb. Each time I flipped the frame she'd run back to the other side. Sneaky! I took a queen marking cup my wife had bought for me and scooped her up into it and set her off to the side (more on this later).
 |
| Queen in the marking cup |
 |
| Queen cage |
 |
| First nuc complete |
This all sounds pretty simple but all told it took about 3.5 hours!
Requeening:
Remember that queen I had removed and put into the marking cup? Well, the reason I removed her from the hive was because I was noticing many signs from this hive of what I think is Chronic Bee Paralysis Virus. The characteristic symptoms are bees with a greasy black shiny appearance, trembling bees unable to fly, clusters of bees walking on the ground and healthy bees trying to drag the sick bees out of the hive. I was able to spot all of these symptoms.
 |
| Sick "greasy" looking bee |
 |
| Clusters of bees walking on the ground |
 |
| Sick bees being dragged out |
So as far as requeening goes, putting a new queen into the hive is one thing. Removing the old queen is another. And dispatching the old queen yet another. Is it sad that I was getting all worked up over having to kill the old queen? Well, I couldn't get myself to just "pinch" her. Since you can make a swarm lure by soaking dead queens in alcohol, I though about just tossing her into a jar of alcohol. But the thought of drowning freaks me out so I couldn't do that either. I finally decided to put her in the refrigerator. If it is anything like dying from hypothermia, then slowly "going to sleep" from the cold might not be such a bad way to go. I hope it works that way anyway! Green Hive queen is dead. Long live the new queen!
Cut Out Hive:
The bees from the cut out seem to be settling into their new home, Yellow Hive. I have fed them two mason jars filled with honey so far to make up for all the honey I stole from them during the cut out. I found the girls have done a really good job of attaching the combs rubber banded into the frames. And they've started to chew through the rubber bands as well.
 |
| Cut out comb |
 |
| Emergency Queen cells |
Next Steps:
I'll be checking the hives to make sure the new queens have been released in a few days. After that I will do another full inspection to make sure there are new eggs and larva. I'll plan on doing some mite sampling at that time as well.
Until then.......thanks for reading!
Friday, July 10, 2015
2015-07-08: First Hive Cut Out
I received a message from a friend of mine a few weeks ago about a guy who had some honey bees living under his shed. So I called him up and asked him if he was SURE they were honey bees and not yellow jackets or hornets. I asked him how big the shed was and how they were entering underneath the shed. Last night I was finally able to schedule a time to go out to do the extraction.
Prior to embarking on this adventure, I watched about every JPTheBeeMan video on doing cut outs. Constructed a bee vac. Found a checklist of items to bring to a cut out. And about anything else I could think of looking for. My basic plan was this: Verify they are honey bees. Find where the hive entrance is. Figure out how to expose the nest by removing the floor. Figure out how much space under the floor the entire hive occupied. Identify the honey combs and vacuum up as many bees as possible in that area. Remove the honey and put it into a bucket. Start removing the brood combs while trying to spot the queen. If spotted, cage her and put her in a safe place. Keep removing the brood combs and cut them to fit the empty frames. Use rubber bands to secure the combs in place and put them into a hive body. Rinse and repeat until done. Easy right? We began at approximately 7:15 PM.
First off, the floor of the shed was plywood and it appeared to be glued to the floor joist. So it was not as easy as removing a few nails or screws and lifting the floor off. My friend Keith was helping me and he had brought a circular saw and a Sawzall. He started cutting the floor along the joist and after some smoke and dust the floor was free.
Lifting up on it we could see that the combs went a little over half way down the 8 foot long section of the shed.
I tested out the bee vac to make sure it would work as the first few bees found their way into the interior of the shed. So far so good. We gathered our wits and decided to lift the floor section up and lean it against the wall. This was mistake number one.
We lifted the section and at first all was well. We started vacuuming bees and making a visual of where the honey was and where the brood nest was. The problem started as the weight of the honey (now perpendicular to gravity) started to cause the combs to collapse and drop to the floor. Once one comb fell out, the neighboring combs started to do likewise and I was scrambling to put the combs in the bucket as Keith tried to hold them in place. Meanwhile, honey is now going everywhere and pooling on the floor. I was tentative and careful with the combs for about a minute before I
started scrambling to get them in the bucket as fast as I could. This is when I received my first sting. As I picked up a comb to put in the bucket there was a bee on the other side that got me. The nitrile gloves I wear don't stop stings but I do believe they prevent the sting from going in very far at all. So it wasn't too bad and we continued to vacuum bees and put the honey combs into the bucket as quickly as we could. At this point all of our tools were covered in honey and I hadn't even put water into one of the buckets I had brought to wash off with. We had the owner fill one up and we tried to wash the honey off (yeah right). After we got into to groove of getting the honey into the bucket we came to realize our second problem. I had brought three buckets and it was not going to be enough. We weren't half way into it and one bucket was full already. We mashed down the combs as much as we could and kept going. Finally, we started to approach the brood nest and bucket number two was now almost full. All thoughts of being able to spot and capture the queen quickly went out the window. On top of all this chaos we were now starting to loose daylight.
It was about 8:30 PM when we started cutting out brood combs to fit in the frames. Thankfully Keith had a very sharp and flexible filet knife that worked well but cutting through brood is never pleasant. Keith kept passing me combs and I kept cutting and rubber banding them into the empty frames. I think the bees were fairly tolerant of all this destruction until we got to the brood nest. Keith made some comments that there were bee guts everywhere. At the time I just assumed he meant because of all the bees that were getting stepped on or the brood cut by the knife. What I didn't realize was that as he was cutting off the brood combs, he could see the bees stinging his hands. He was wearing some sort of canvas mechanic's gloves and they must have been really good because none of the stings were penetrating the gloves.
This was a good thing because he was able to keep cutting the combs and handing them to me as I was putting them in the frames......until we ran out of frames. Ugh. I had brought two boxes of empty frames....except one of them was in use by the bee vac. Dumb! Luckily I was able to remove from the frames some of the brood combs that were empty or mostly drones and replace them with the remaining worker brood comb. After I did this we were able to get the last of the combs in the frames and were almost finished.
Here is what it looked like when the last comb was finally removed.
I think the combs were about four feet long. That was a big hive!
9:15 PM and all we had left to do was to vacuum up as many of the remaining bees as possible, pick up and clean off our equipment and close up the shed. This is where the vacuum started to loose suction. We pulled the vacuum hose off, closed up the box and tried to flush out the hose. After spraying water into the hose for a while, a big clump of bees started to wash out. There were so many bees in the box at this point that I thought we couldn't vacuum any more in even after washing out the hose. In hindsight I probably should have tried to vacuum more since there were still a few clumps of bees wandering around here and there and a small cluster on the outside of the shed. I'm sure my exhaustion didn't help my thinking process.
I shut the vacuum off and started to clean things up when I realized another mistake. How was I going to put the box of brood combs onto the box of vacuumed bees without releasing all the bees I had just vacuumed? Sadly, I had made a shim with a wire mesh insert for this very purpose.........and I left it at home! You are suppose to place this shim on top of the vacuum box. The wire mesh prevents the bees from exiting the vacuum box. Then you place the brood comb box on top of the shim and then you pull the mesh out which allows the bees in the vacuum box to move up into the brood box. So much for that idea. Good thing for me that Keith's truck has a midgate and were able to put the brood box in the back and not have bees flying up into the cab of the truck with us. 9:30 PM and we finally had everything cleaned up and loaded into the truck.
The ride back to Keith's house was full of thoughts of what we did right and what we could have done better. More buckets, more frames, more hive boxes, more light, more time and don't hang the combs perpendicular to gravity were just a few of the changes we need to make if there is every a next time. Once at Keith's we were able to weigh the buckets. The honey came in at 51.96 pounds. Subtract out the weight of the bucket and the weight of the wax and I'd guess around 45 pounds of honey.
Done. Except for the fact that I now had to get the boxes home. Get them set them up in the dark. And open the box of vacuumed bees and put the brood box on top of them. I was really worried that when I opened the bees in the dark after their recent trauma, that they were going to be pissed! They did boil out of the box a bit but thankfully I was able to slide the brood box on top without too much trouble and the bees weren't flying much in the dark. No additional stings there!
The following day I was able to pick up some new cement blocks and set everything up for the new hive. I leveled the blocks and set up the bottom board. I undid the ratchet straps on the vacuum box and transferred the brood box over first and then the box full of vacuumed bees. They hadn't built any comb on the empty frames so I just shook them off the frames and into the box. I then added two boxes of plastic frames on top and then the inner cover. Since I had all their honey in a bucket, I figured they would need to be fed. I took some honey from some crushed combs I had and put it in an inverted mason jar feeder and placed it on top of the inner cover. I then stacked two empty boxes around the feeder and placed the outer cover on. Without further adieu.....introducing Yellow Hive!
At this point I have no idea if I have the queen or not. I have a feeling by the way the bees seem to be wandering all over the place, that the queen is not there. I'm hoping I'm wrong but I'm going to check on them in a few days. If I see queen cells or young larva in the brood box then I will know one way or the other.
Until next time, thanks for reading!
Prior to embarking on this adventure, I watched about every JPTheBeeMan video on doing cut outs. Constructed a bee vac. Found a checklist of items to bring to a cut out. And about anything else I could think of looking for. My basic plan was this: Verify they are honey bees. Find where the hive entrance is. Figure out how to expose the nest by removing the floor. Figure out how much space under the floor the entire hive occupied. Identify the honey combs and vacuum up as many bees as possible in that area. Remove the honey and put it into a bucket. Start removing the brood combs while trying to spot the queen. If spotted, cage her and put her in a safe place. Keep removing the brood combs and cut them to fit the empty frames. Use rubber bands to secure the combs in place and put them into a hive body. Rinse and repeat until done. Easy right? We began at approximately 7:15 PM.
 |
| The Shed |
 |
| Hive Entrance |
 |
| First Floor Cut |
 |
| First Peek at the bees |
I tested out the bee vac to make sure it would work as the first few bees found their way into the interior of the shed. So far so good. We gathered our wits and decided to lift the floor section up and lean it against the wall. This was mistake number one.
 |
| Floor leaned up against the wall |
 |
| Half way done |
It was about 8:30 PM when we started cutting out brood combs to fit in the frames. Thankfully Keith had a very sharp and flexible filet knife that worked well but cutting through brood is never pleasant. Keith kept passing me combs and I kept cutting and rubber banding them into the empty frames. I think the bees were fairly tolerant of all this destruction until we got to the brood nest. Keith made some comments that there were bee guts everywhere. At the time I just assumed he meant because of all the bees that were getting stepped on or the brood cut by the knife. What I didn't realize was that as he was cutting off the brood combs, he could see the bees stinging his hands. He was wearing some sort of canvas mechanic's gloves and they must have been really good because none of the stings were penetrating the gloves.
 |
| Lots of stings in the glove |
 |
| Banding combs in place |
 |
| Comb attachements |
9:15 PM and all we had left to do was to vacuum up as many of the remaining bees as possible, pick up and clean off our equipment and close up the shed. This is where the vacuum started to loose suction. We pulled the vacuum hose off, closed up the box and tried to flush out the hose. After spraying water into the hose for a while, a big clump of bees started to wash out. There were so many bees in the box at this point that I thought we couldn't vacuum any more in even after washing out the hose. In hindsight I probably should have tried to vacuum more since there were still a few clumps of bees wandering around here and there and a small cluster on the outside of the shed. I'm sure my exhaustion didn't help my thinking process.
I shut the vacuum off and started to clean things up when I realized another mistake. How was I going to put the box of brood combs onto the box of vacuumed bees without releasing all the bees I had just vacuumed? Sadly, I had made a shim with a wire mesh insert for this very purpose.........and I left it at home! You are suppose to place this shim on top of the vacuum box. The wire mesh prevents the bees from exiting the vacuum box. Then you place the brood comb box on top of the shim and then you pull the mesh out which allows the bees in the vacuum box to move up into the brood box. So much for that idea. Good thing for me that Keith's truck has a midgate and were able to put the brood box in the back and not have bees flying up into the cab of the truck with us. 9:30 PM and we finally had everything cleaned up and loaded into the truck.
 |
| Loading up |
 |
| Honey! |
The following day I was able to pick up some new cement blocks and set everything up for the new hive. I leveled the blocks and set up the bottom board. I undid the ratchet straps on the vacuum box and transferred the brood box over first and then the box full of vacuumed bees. They hadn't built any comb on the empty frames so I just shook them off the frames and into the box. I then added two boxes of plastic frames on top and then the inner cover. Since I had all their honey in a bucket, I figured they would need to be fed. I took some honey from some crushed combs I had and put it in an inverted mason jar feeder and placed it on top of the inner cover. I then stacked two empty boxes around the feeder and placed the outer cover on. Without further adieu.....introducing Yellow Hive!
 |
| Bees in their new home |
Until next time, thanks for reading!
Subscribe to:
Posts (Atom)